I have it in my mind to do a fresco. SteveL of the Painting on Location with Color Forum, in the Fresco Category asked if the Real Color Wheel would work in fresco. This fresco set of tests will show you how to make a buon fresco and use the RCW. All pigments show their lime test results.
What I've learned about making a fresco panel and painting it.
1. Use a non-warping board, tile or brick.
2. Board, Use an isolator like paint or tar paper on a plywood board.
3. Cut the metal lath to size and stainless steel staple it to the support, overlap the edges or not.
Use unpowdered latex examination gloves to protect your hands from lime. Lime in your eyes hurts, wash with milk.
4. Make intonaco mortar 1:1, fine white sand or fine crushed limestone plus pit lime. Mix the pit lime smooth by hand, squeeze out any lumps. Optionally, add a thumbnail of dissolved alum to make it dry harder.
5. Have enough water in the mortar to make it sticky.
6. Make rough mortar by adding 50 to 100% large sand to the intonaco mortar, work it in with gloved hands.
7. With a wet sponge, spread around some intonaco mortar on the pre-soaked wet tile, cover it with this thin lime plus sand mixture very thinly. Wait until the sheen is gone before adding the rough coat.
8. Plop the rough mortar in the middle of the tile and spread it to the sides, using pressure will insure there are no air bubbles. Trowel it a flat 1/8th inch or less.
9. Or apply 1/8th inch of loose rough coat mortar into the lath if you're not working on tile.
10. Use a wet sponge over the smooth surface in a circular motion to make a flat rough surface. It must be very level. This will bring a lot of lime to the surface, sprinkle the surface with dry medium grit sand and trowel pat it in with the lime cream rich sponge. Leave the edge over hang, remove it when the mortar is firm.
11. Let the rough coat dry before adding the intonaco, a one day wait is fair, a seven day wait is excellent. The rough may take a half hour to lay, the intonaco may take an hour and a half. Bubbles don't rise to the surface in wet mortar, they appear when pressure is applied to the surface. Pierce them with a pin and work them out.
12. I mark the top/side rough's edge dark so I can tell the thickness of a new added intonaco layer.
13. Soak the dried rough coat, apply some loose mortar with a wet sponge, wait a half hour before adding the intonaco. This will help eliminate bubbles and make a secure bond because the rough-brown layer will now absorb water.
14. Trowel or hand press on about 2.5 to 3 inches square of intonaco mortar. That will give you a 1/8th inch or less intonaco, never more than 1/8th inch. The mortar must be loose enough to be sticky and plop if it's dropped. Pat the intonaco while in place, that will stick it on and remove bubbles.
15. Use next size smaller trowel to finish smoothing out the intonaco and make it perfect.
16. Clean your trowels with used 150 grit wet and dry sandpaper, or new 220 grit. Dry them well it they are made of steel.
17. Let it set a half hour and cover it with plastic if you want to paint on it the next day. Let it set an hour or more if you want to paint on it the same day. Brush on lime water and be sure it is absorbing before starting to paint.
18. Working on a "next day" fresco, brush on limewater until it soaks through and dissolves any crust, two to four coats and paint away or recover it in plastic for another "next day" painting. If at this point you wait 2 days to paint, the top crust of calcium carbonate can be removed with a sponge. Soak the whole tile long enough and the crust will come off in large flakes. This will give a rougher sandy surface to paint on.
19. Add a coat of lime water every hour while you're painting, after the colors have absorbed of course. This will add painting time.
20. Use clear lime water as the painting medium, use only colors you know are lime safe.
21. Test colors by putting color and wet lime in a sealed jar, if it's still the same color four days later it's lime safe.
22. Paint darker colors first, after the colors have absorbed the next opaque layer of paint will cover the first layer and not mix with it. Titanium white is not very opaque.
23. Wash lime out of brushes with vinegar, wash vinegar and color out of brushes with soap. Wash lime out of your eyes with milk and sugar.
24. Add alum to egg when painting secco to make it waterproof.
25. Don't make tints with only thin washes, use full bodied paint.
26. Add titanium white to lime cream when you add it to pigments to make a tint, then the color you see while you paint will be the color it dries to.
27. It's better to let one side of a giornate dry before adding the new area. Wet the cut and the rough brown coat well with limewater.
28. If you store your pigments in water, add ammonia to curb mold. This is very important for earth colors.
29. Alcohol does not mix with lime water, ammonia does.
30. Alcohol destroys egg.
31. Alcohol does not dissolve alum.
32. Ammonia and alum mix well.
33. Ammonia and casein mix well.
34. Ammonia and egg mix well making no clumps and a thicker translucent egg that behaves well.
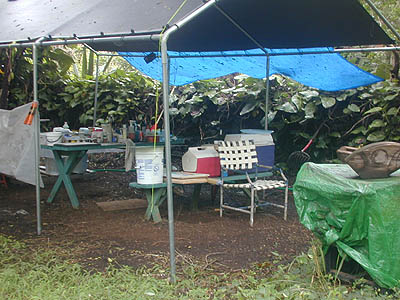
Today I made the outside studio area to paint fresco here at my friend Piero's Villa in Kaupo.
There's a tarp over my work area because it has been raining so much here lately.
I guess that's good to keep the fresco moist. On the right is my inside studio in Nahiku, also a very wet area.
I mixed a 20 lb. bag of hydrated lime in 2 five gallon buckets, sifted and stirred it up real well and put a top on them. In two months there was 4 inches of lime water on top and the lime was just as thick as the 2 year old lime.
I still have the 2 year old slaked lime to compare this lime to. SteveL has 9 year old lime.
In some prepared mortar I added 25% lime and enough black pigment to give me a black base coat. While it was drying I scratched in some deep texture lines to give the new lime something to get a good hold on. I'll scrub it good and paint on some casein where I'll be putting the next layer. I plan on layering on a few wet lime coats to paint on and leaving a decorative boarder black.
There is a comparatively new product out now, it's an acrylic based adhesive/bonding agent. Use it between layers for a tighter bond.
Here's a little about lime.. It's the weakest part of your mortar, sand is strength. Rough crushed sand, limestone, lava or marble is better than smooth sand. Three sand to one lime is stronger than 1:1 sand to lime. Mortar not locked down will shrink, a 1/8 inch thick layer of mortar on a 12"x12" glass will shrink a fat 1/4 inch. That amount of mortar is a 2.5 inch square, one pound of mortar, and should be just firm enough to form one tile. I think the best mortar I've made was with what is called crushed white marble from the cement dealers, it's really crushed limestone and it's used by the pool building trade. I sifted it with a common strainer, not the fine flour strainer I used for sifting the lime into the store bought morter, use the next larger size. The larger grit sizes I used in the brown coat / rough coat / first layer. For fresco panels only two coats are needed, and the first coat should be dry before applying the thin intonico (less than 1/8th inch) coat or top layer.
The reason for using white limestone in the pit lime is big. Seeing the colors used clearly is very important, so you need a white base. Using lime paste and lime pigment as white is Ok but not the greatest. I like WYSIWYG. Use titanium white instead, and don't paint with washes. Lighten your tints with titanium white not limewater. True, all colors lighten as the fresco dries but it's really not that much. It's about the same as wet and dry watercolors, maybe twice as much if you use washes instead of mixed tints. Mixed tints change less than watercolors do, so it's not much.
Everything I'm saying here is backed up with photographs.
Lime water does not seem to dry white as I first thought. I made 4 batches of lime to slake, two small ones from a bag of hydrated high calcium lime sifted and mixed until it was smooth and one from the lime sifted into the water. The third sample of lime water came from lime that had slaked for more then two years. All slaked lime is also called pit lime.
None of the lime water tested turned white after drying on wood, metal or my black pigmented lime mortar base coat. Everything I read said it should but it didn't. As long as the water is clear and has a floating crust of carbonate I know it's good.
Fresco on Location
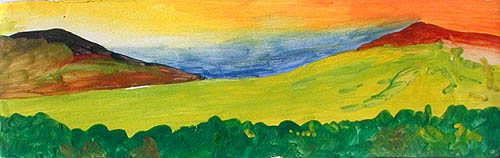
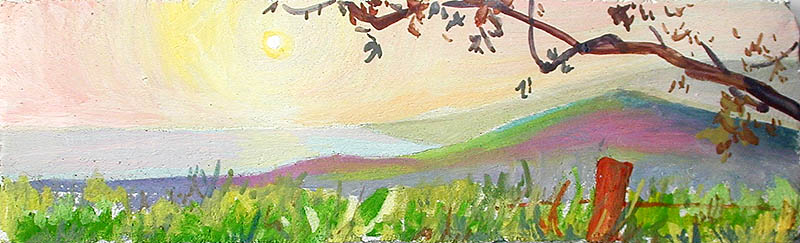
That has got to be a new category! Anyway, it's not hard and I wanted to practice laying on color since this was my first buon fresco. I took a brick 3/8x2.5x8.5 tile and laid on 3 coats of pit lime mixed 1:3 with sand, twice at 1/4 inch each, and a top coat 1:2 at 1/8 inch with white marble meal. Each time I waited until the mortar was set, no sheen, dry enough to still push and indent with my finger. Just like all the books told me to do.
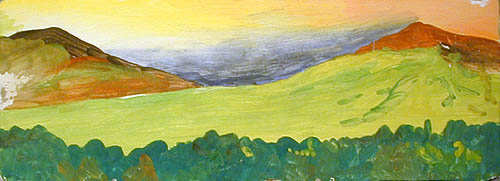
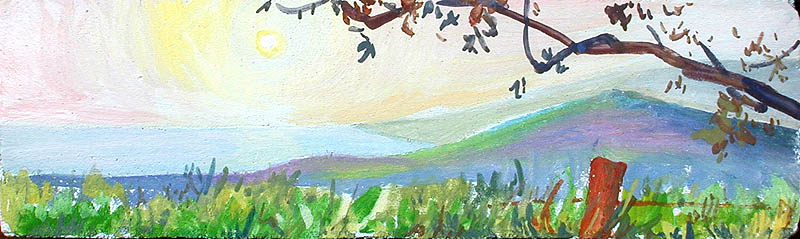
This first photo is the fresco right after it was painted, the second photograph shows how the colors changed in three days. The sides were plastered also and painted in a continuation of the scene, it's one inch thick total.
Three days later it cracked, because the top dried out before the insides. Perhaps I should have let the lower coats dry first which I'll do on the Little Bella fresco. Notice the color changes in the ultramarine blues at the tops of both mountains. The left mountain was mixed with ultramarine blue and burnt sienna to make a green dark. The next fresco will be using cobalt blue deep instead of ultramarine light because I use that hue to darken burnt sienna and orange. I've since learned that cobalt blue deep turns a dark blue gray in fresco but not in secco.
Also the Ultramarine's turn white when mixed into the mortar but not when painted on as fresco.
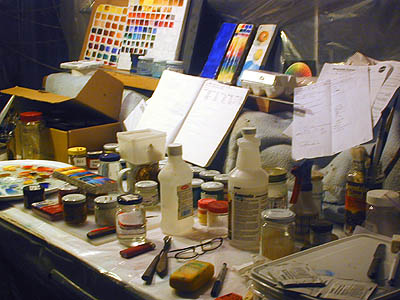
Here is the lime in a jar with pigments tests. Ultramarine is very safe in secco only, glue the secco pigment with casein medium or egg.
Here is the picture of the cracks, since it was still moist and pliable, I pressed out the cracks and ruined it.
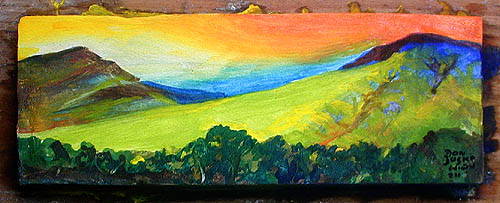
Today Jan. 9th, 2004, I did the same painting test on the same type of brick tile with
only a 1:1 marble meal top coat and pit lime. No cracks.
Three Weeks later, the cobalt blue deep pigment in the sky turned gray and the
ultramarine blue in the left mountain turned white, like in the jar test link above.
2-12-04, I could scrape off the thin pigment wash on the left mountain edge.
The thicker opaque pigment bonded well, but still got lighter.